How To Deploy Your React App To The Google Cloud Engine
Today we will be deploying our React app to the Google App Engine. While there are many ways to do this, In this article we will simply create a new project on the google app engine and upload our final production build folder from our react application along with a yaml config file to a Google Storage Bucket. Then we will be deploying it directly from the google cloud shell.
Let’s begin!
First thing you will need is a Google Cloud Computing account so head over to
Click on get started for free.
Upon agreeing to Google’s terms of service you will gain access to
“everything you need to build and run your apps, websites and services, including Firebase and the Google Maps API.”
These days Google is throwing in a free $300 USD credit to spend in any of their cloud services over a period of 90 days. Giving us a great budget to play around with and decide whether the service works for us.
Once you have completed inputing your payment info and you’ll be all signed up so we can go ahead and get started with deployment!
Click on the “Go To Console” button and you will be taken to the Google Cloud Platform.
From there we a can select our project.
Since we don’t any projects yet let’s create one by clicking on the little down pointing arrow between the “Google Cloud Platform” header and the search bar.

From there click on New Project:

Once you have created your project, is time to get started uploading some files to the cloud!
Head over to Storage by clicking on the main menu in the top left corner of the page and hovering over “Storage” you will see a drop down menu.
Select “Browse”.

Here you will create the containing bucket for our new project by clicking on “Create Bucket”.

You will be prompted to create a new bucket.
The first decision you will have to make is what to name your bucket.
You must pick a name that is unique to Gooogle’s global service .
“Pick a globally unique, and permanent name.”
Next we also have to choose where to store our data geographically.
Here I recommend choosing “Multi-Region” for highest availability across greatest area.
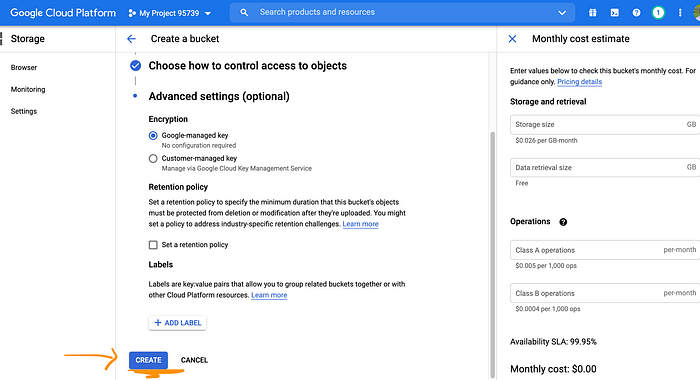
Next for we will choose the standard options:
- us multiple regions in the us
- standard default storage class
- fine-grain access control
- Google-Managed key encryption
And then click “Create”.
Now that we have our newly created bucket we are ready to upload our React app into it!
Head over to your React application root folder and create an app.yaml file.
In it we will add the following basic server configuration:
runtime: nodejs12
handlers:
  # Serve all static files with url ending with a file extension
  - url: /(.*\..+)$
    static_files: build/\1
    upload: build/(.*\..+)$
  # Catch all handler to index.html
  - url: /.*
    static_files: build/index.html
    upload: build/index.html
Now run the following command:
npm run buildThis will create a build folder at your project’s root directory.
Navigate back to your bucket in your browser window and upload the build folder and the app.yaml file.
After the uploads your bucket should look something like this:
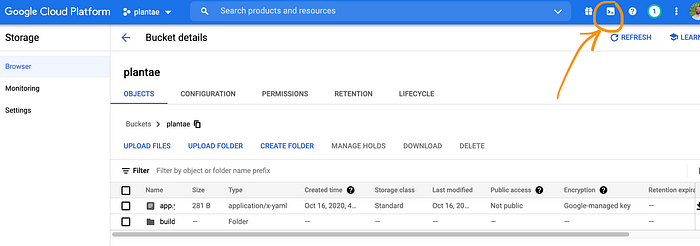
Click on the little
>_
to open the cloud terminal.
Here we want to make sure that our current project is set.
These days Google will do that automatically while provisioning your Google Cloud Shell machine.
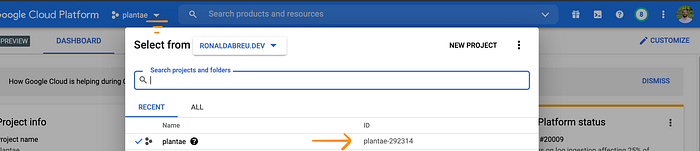
However if for some reason you don’t see your current project name on the terminal you should set it by running:
gcloud config set project [PROJECT_ID]You can find your project ID by clicking on your project name from the menu bar.
Click Authorize.
Now that we have made sure we set our current project we want to create a directory to which we can move our files and deploy them.
Make a directory by running:
mkdir directory-nameOf course directory-name represents whatever project name you have chosen.
Next we will run:
gsutil rsync -r gs://bucket-name ./directory-nameThis will sync our bucket files to our new directory.
Now change directory into our newly created folder:
cd directory-nameAnd from here we can finally deploy our app by running:
gcloud app deployPress Y to continue.
We can get a link to our live app with:
gcloud app browserAnd Voila!
Congratulations! you just deployed your first React-App to the Google Cloud App Engine.
Stay tune and be sure to follow for future articles like this one.
Next we will discuss how to add a custom domain name to your gcloud hosted application.
Until then,
thanks for reading and I hope it was a useful and enjoyable read.
If you have a different way of uploading your applications to the google cloud engine I’d love to hear about it so please feel free to let me know in the comments below!